How to share your Amazon prime membership benefits with other people? NOT USED
admin / March 20, 2026
You can share your Amazon prime membership benefits with a total of 10 people and here’s a breakdown of those 10 people:
- Each account holder can give four kids access to Amazon prime and buy things with a parent’s approval. They also have access to Amazon Prime video that is age appropriate.
- Each account holder can give four teen access to Amazon prime to purchase things with a parent’s approval much like the kids version The only difference is access to prime video that is age, appropriate.
- Each account holder can give two adult accounts to share with two other adults.
Adding these 10 people does not cost extra and it’s included in Amazon prime membership, The two adult accounts that can be created. Those two accounts that are created can choose to leave the family group and have their very own paid Amazon prime membership and have the same benefits to share with 10 other people if they choose.
Here are some things to know before you choose to share Amazon prime membership with other people. Each account can share their prime membership to the maximum of 10 people in which it has been broken down to the three groups, if a person leaves the family they cannot be added to your group until 180 days have passed, if you use up your membership slots. If you accidentally add the person and then delete the person immediately, it still counts as using one slot.
For this article, we will be referring to the account owner/holder who is sharing their Amazon prime membership, benefits with other family members by inviting them the admin, the admin can invite additional family members as long as they don’t reach the maximum numbers, they can also remove family members as well.
Lets start added someone. For this article, we will use the name John Doe.
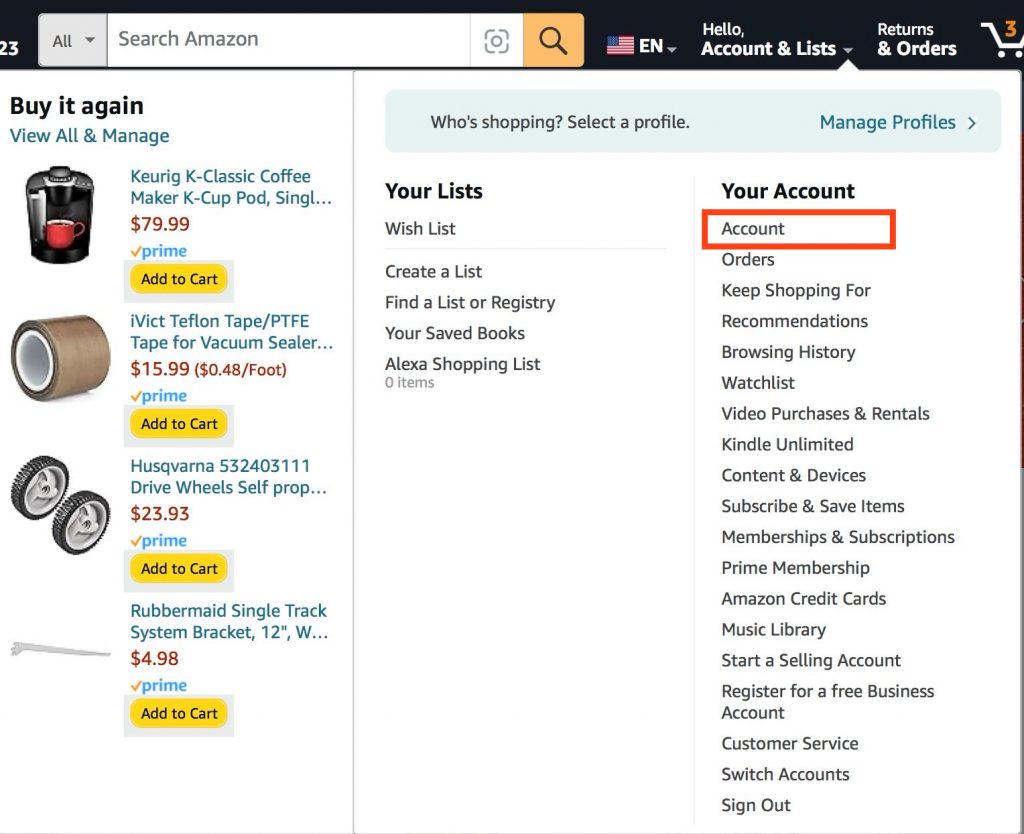
Login to your Amazon account and click on Hello, <Your name>, then click on Account, it’s under your acccount.
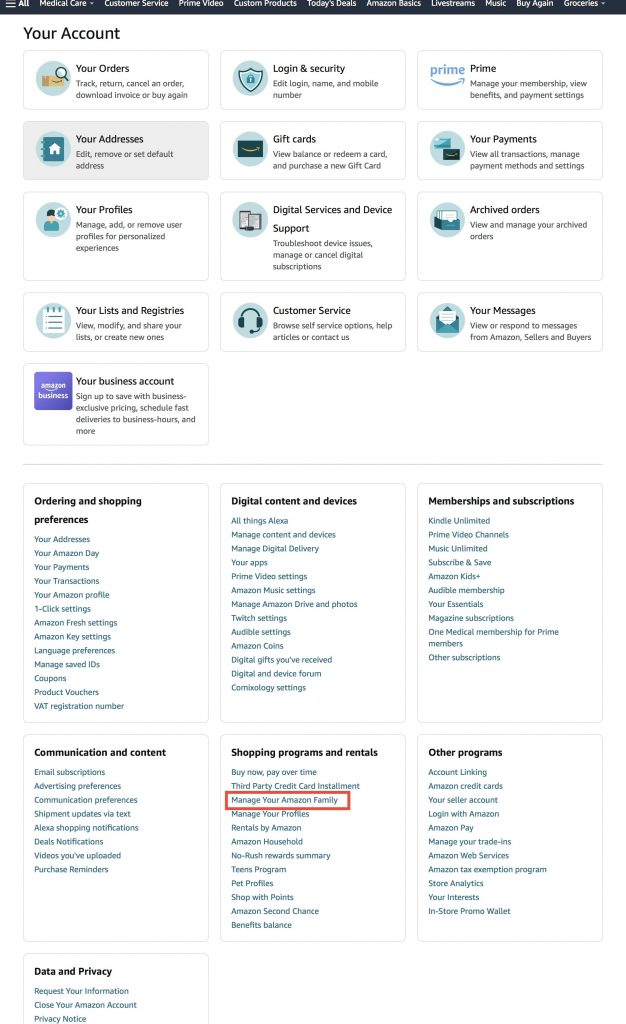
On this page scroll all the way down until you see the section “Shopping programs and rentals”, then look for the link that says “Manage Your Amazon Family” and click on the link.
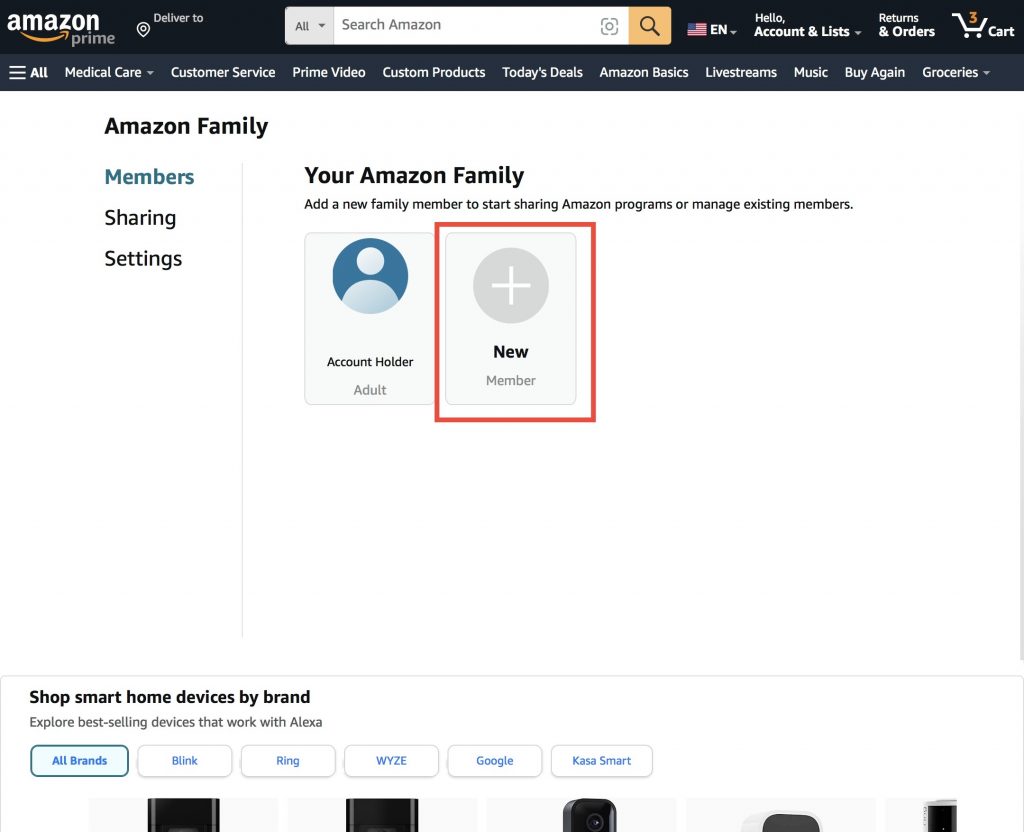
On the page Your Amazon Family, you will see your profile image if you have one, your first name, and the type of account, next is the option to add a new person. Click on New.
Heads up! You will need their name and their email address in order to send them an invitation. If you do not have it you will need to get it from them. If you make an error it will count as one user even if they do not receive the invitation.
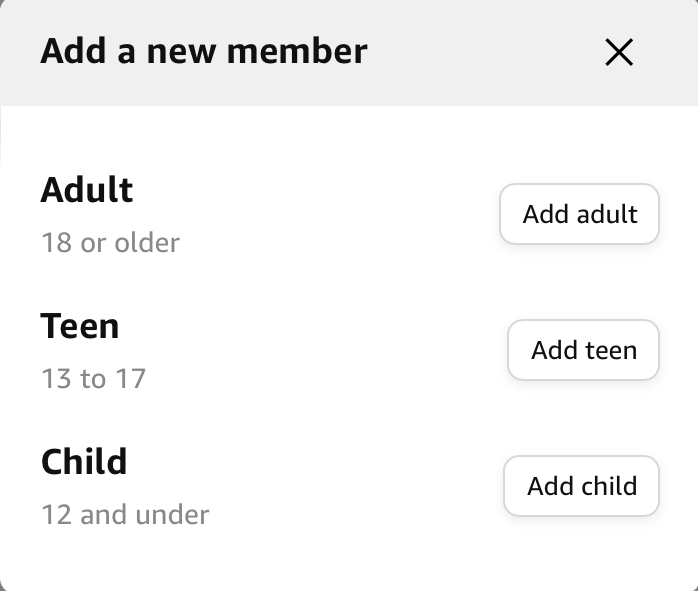
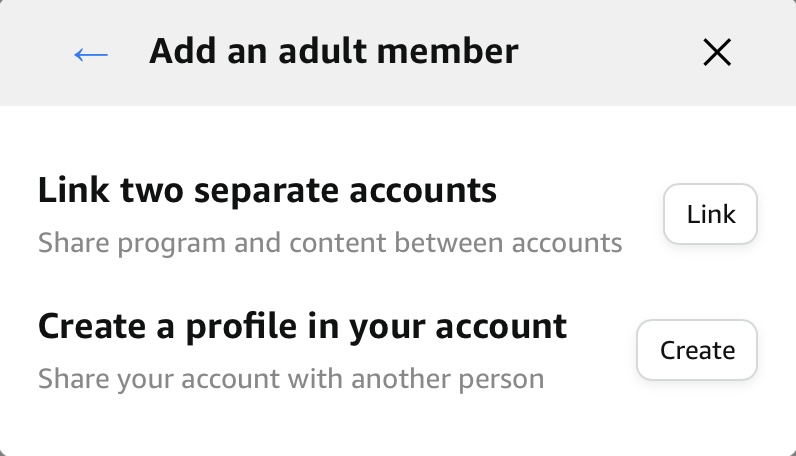
After you click on New, a pop-up dialogue box will appear, this will ask you what type of account you want to create. For this article we will be adding an adult account, for this click on Add adult.
After clicking on Add adult now you have the option to chose link two separate accounts or create a profile in your account. If you chose to link two separate accounts, the other person i.e. John Doe must have his/her own Amazon account, where as sharing your account with another person you (admin) and John Doe will need your login credentials to login, then chose admin or John Doe account.
For this article we will be using link two separate accounts, so we clicked on Link.
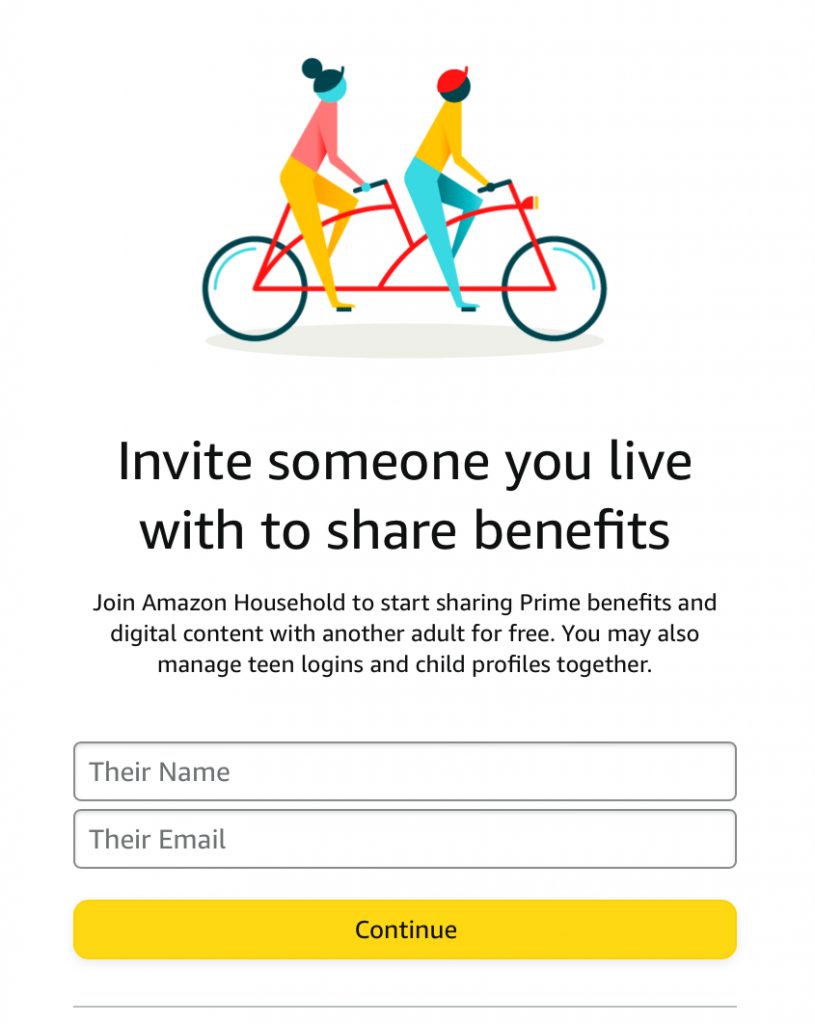
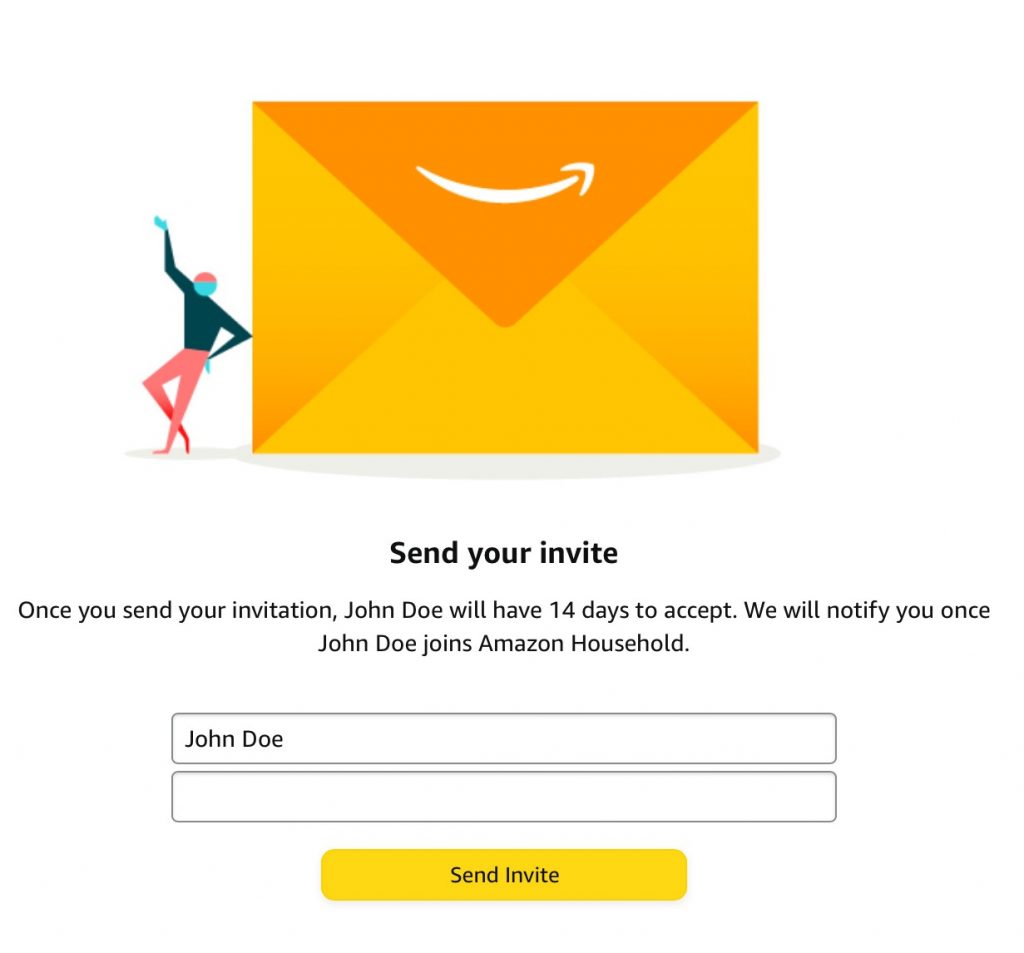
On this page you will need to enter the person’s name and email address that you wish to send the invitation to, that will contain the invitation link, then press continue.
Note: They MUST accept the invitation within 14 calendar days from the date the invitation was issued or it will expire.
This will be a confirmation page asking you to confirm if you want to really invite this person. For this article we used to name John Doe. Only click on agree and continue if you agree to this otherwise press cancel.
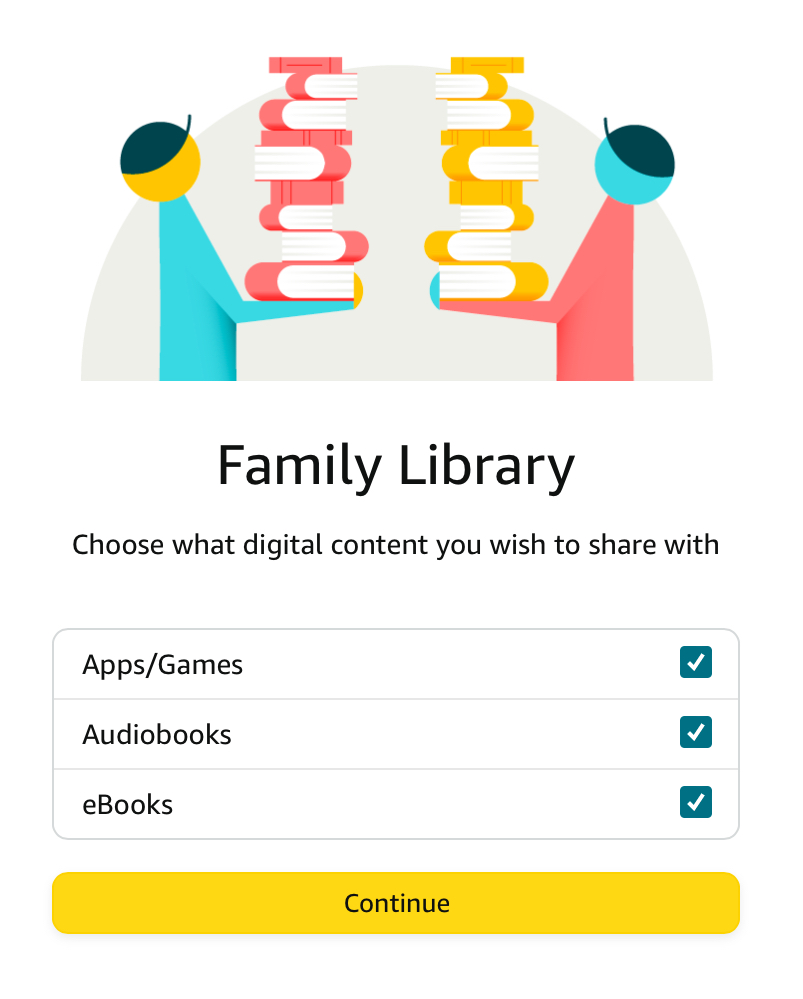
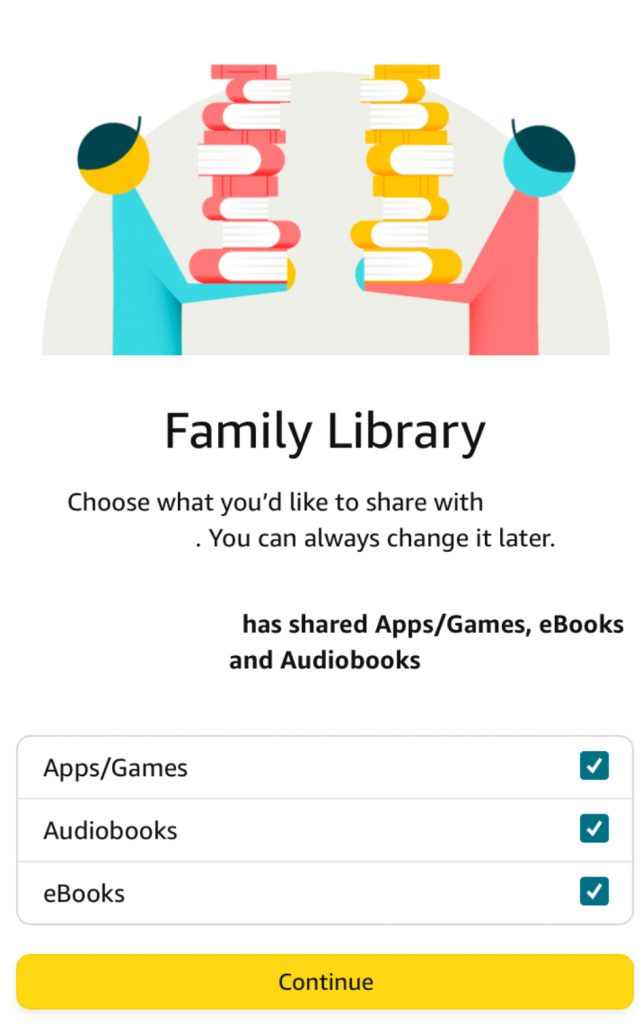
On this page, you will have the option to share your family library, your family library includes the following: Apps/Games, audiobooks, ebooks. (Checked = yes, unchecked = no, by default they are all checked.) if you want to share, apps and games, audiobooks and e-books, leave the checkmarks as they are, and just press continue.
I’m not sure why Amazon is having you type in the persons name again and their email address, I am assuming this is a way to confirm or verify that the information you typed in on the previous step matches what you’re going to be typing here similar to what they do with a password confirmation to verify that the password matches.
Note: They MUST accept the invitation within 14 calendar days from the date the invitation was issued or it will expire. Amazon will notify you via email once the person who you sent the invitation to except your invitation.
CONGRATULATIONS! You should receive this message, this is indicating that you successfully invited somebody and from now and 14 days later they should accept your invitation. You don’t need to do anything from this point as now the ball is in their court. Remember they have 14 days to accept the invitation if they do not accept the invitation within 14 days it expires.

At the very beginning the person who is inviting you we are going to refer to their account as the admin account, you who is being invited we would refer to your account as a user account since the person who is invited. The person who invited you a.k.a. the admin has the right to remove you from their account and doing so will also revoke Amazon prime membership benefits, just like the admin has the right to remove you, you also have the right to remove yourself and you will lose Amazon prime membership benefits.
If you wish to get them back, you would need to purchase Amazon prime membership or contact the person who invited you to see if they will be able to re-invite you again and you will need to go through the same process that you were going to go through now.
Now it is time to get you all set up since the admin sent you the invitation.
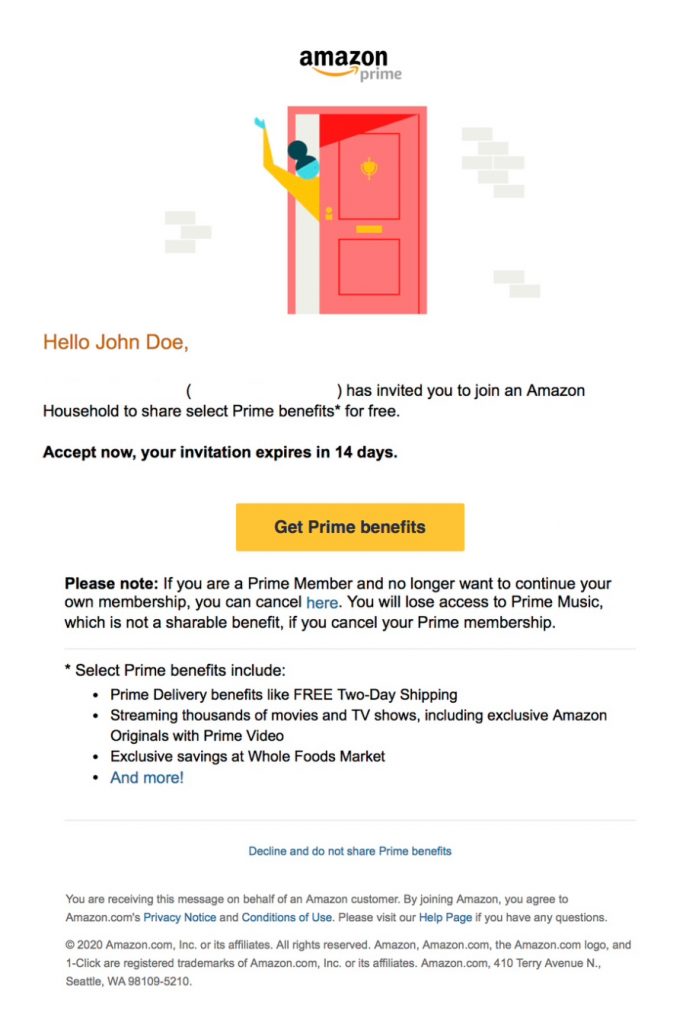
The invitation will be sent to you by email, check your email to see if you see an email titled “Jane Smith invited you to share Pri…” and it will be coming from @Amazon.com email address. If you don’t see the email in your inbox, check your spam folder.
After you open up the email invitation that was sent to you, you see a rather large golden button that says Get Prime benefits.
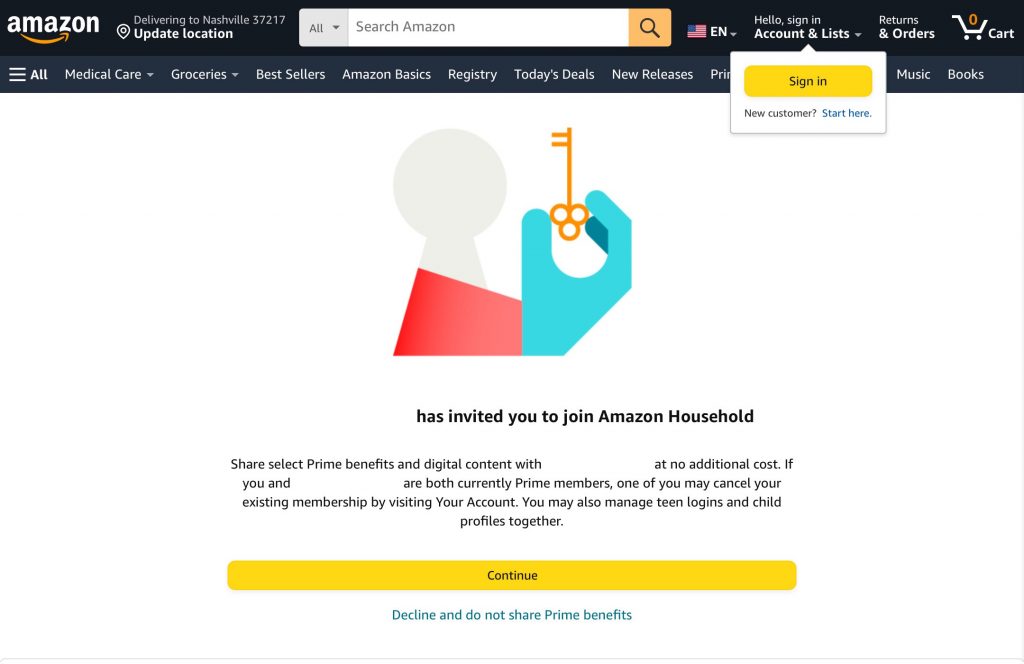
If you have an existing Amazon account please click on Hello, sign in and then sign in to login with your login credentials and then skip section B entirely and follow the directions starting with section C.
If you are new to Amazon or you don’t have your own Amazon account because you used somebody else’s click on Hello, sign in, then under sign in you should see new customer? Start here, click on start here and continue with section B in its entirely then continue to section C.
Section B
You need to fill in the registration form in its entirety, starting your first and last name, mobile number or email address, password must be six characters in length and finally you need to confirm the password by typing it in again. Once you have completed the registration form in this entirely be sure to read Amazon‘s condition of use and privacy notice. Only press continue if you agree to Amazon‘s condition of use and privacy notice.
You need to solve some human verification challenge to prove you’re not a robot.
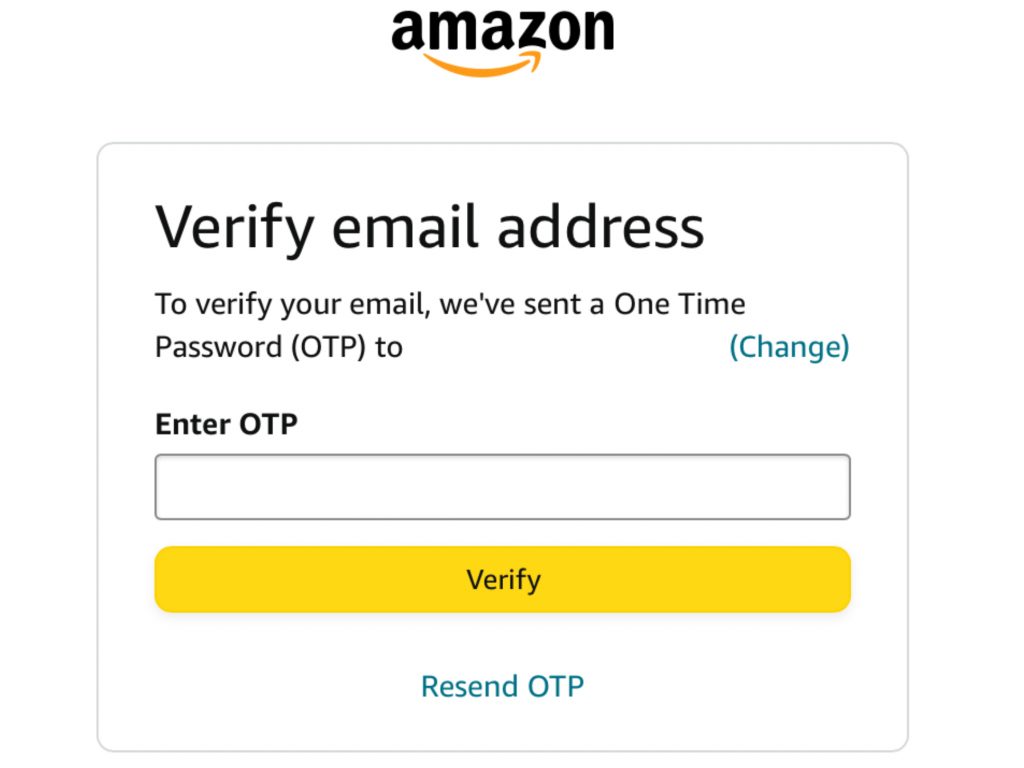
Now we are going to receive a one time password (OTP) that will be sent to the phone number or email address that you provided during the previous step. This is important to make sure that you entered your phone number or email address correctly. if you provided your phone number wait a few seconds there may be a slight delay, if you provided your email address there also may be a slight delay and you also may need to check in your spam folder to see if the email that Amazon sent you is in the spam folder.
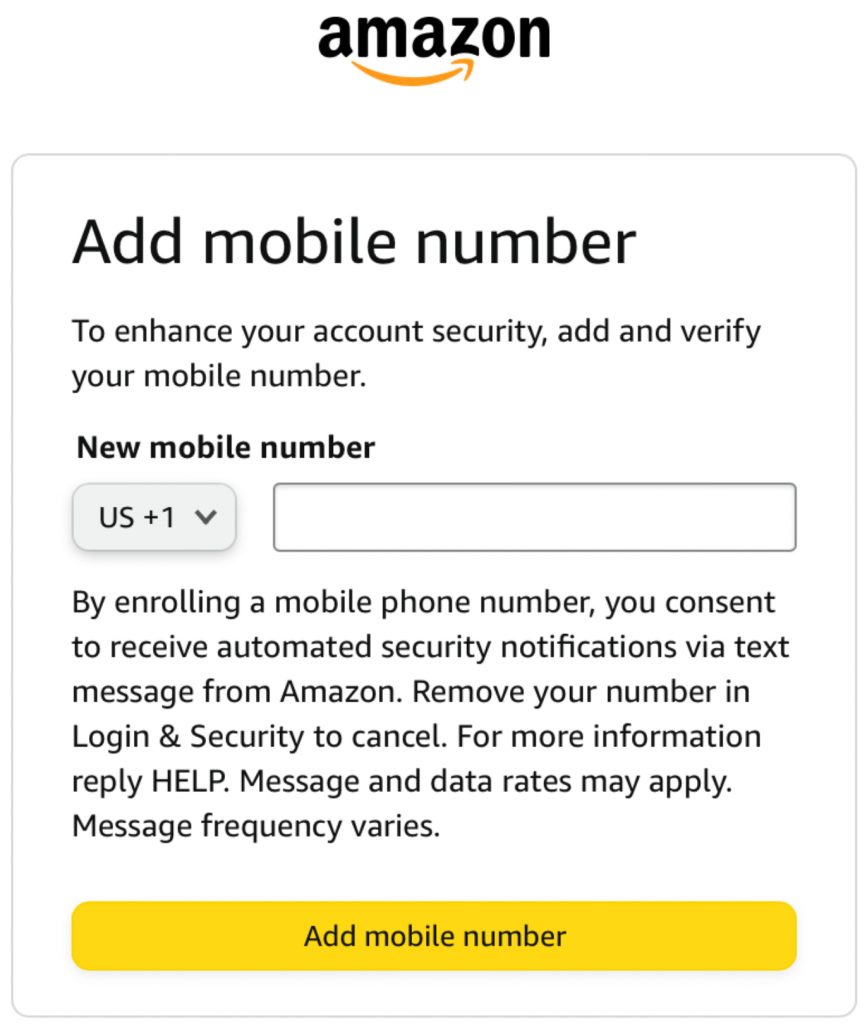
Now Amazon is asking you to provide a mobile phone number starting the country code. For the United States the country code is +1, enter your phone number, starting with the area code, and they are also going to send you an OTP that you will need to confirm on the next page.
There appears to be no way around this, you will be required to provide them with a mobile phone number. I strongly recommend that you DO NOT use a disposable number since this could allowed unauthorized users to access your account and also possibly your family account.
Just a note: The previous step and this step that we are on now I would imagine they would be swapped, had you provided your phone number first they probably would be now asking you for a email address, I think Amazon is going to get your phone number and your email address one way or the other and there does not appear to be any way around this.
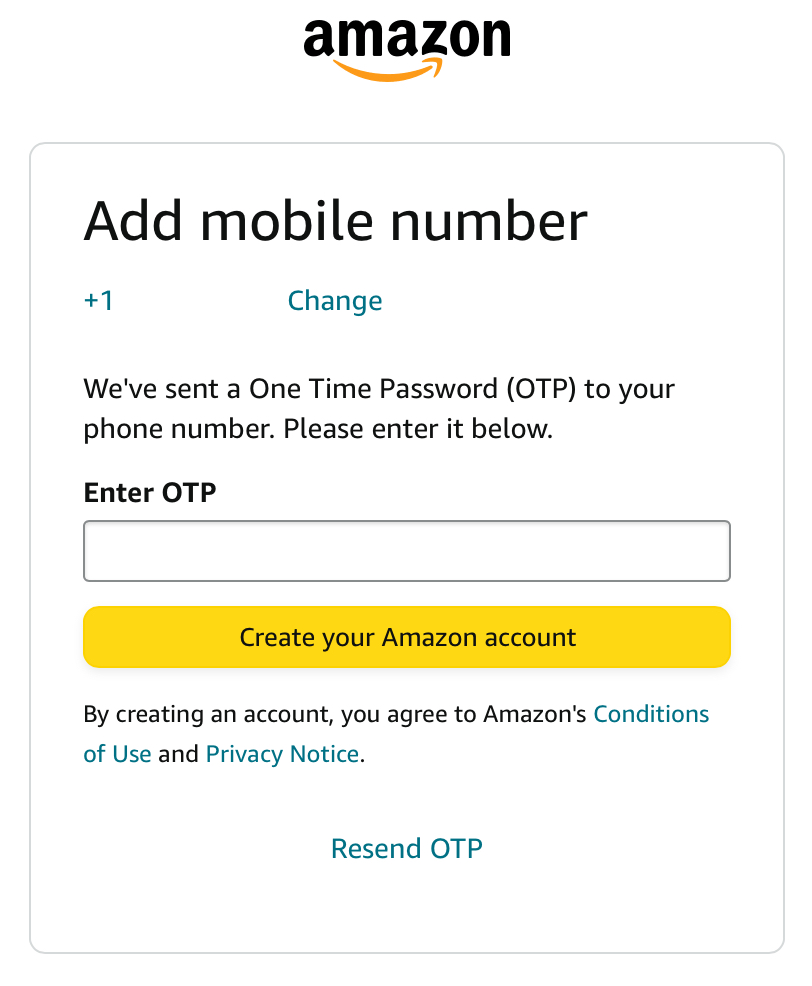
Enter the OTP and then press create your Amazon account.
WOOHOO! You now see your newly created Amazon account so now it’s time to join a family to start receiving the Amazon prime membership benefits. Please continue with following the directions on section C.
Section C
If you do not have an Amazon account and you need to create one, please go back to section B and follow the directions as outlined in section B then continue to pick up the directions from this point on and continue until the end of section C.
This is section C, that we are about to start. A valid credit card will be required in order for you to have all of the Amazon features enabled. If you do not have a valid credit card, some of the features may be limited until you add a valid credit card to your account.
Sign into your Amazon account with your existing email address or phone number and password and click sign in, if you have two factor authentication enabled you will need to enter the one time passcode once you’ve done that and you are signed in.
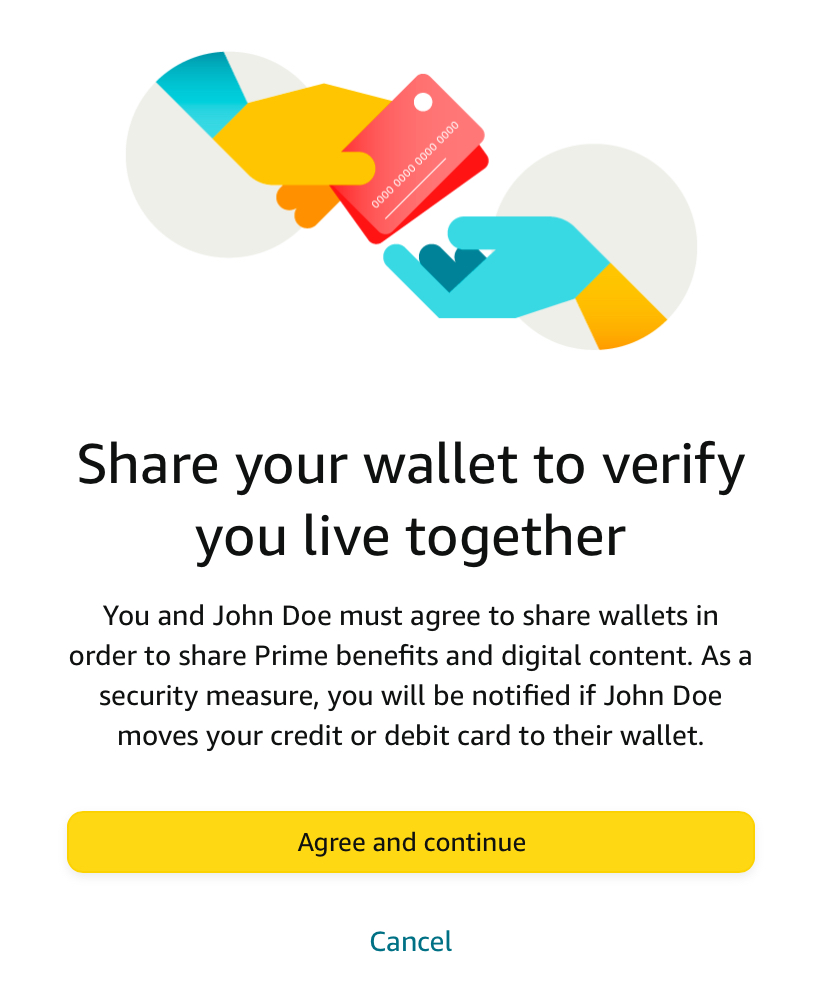
Now it’s going to ask you to share your wallet to verify that you live together. Click on agree, and continue only if you agree, you can choose to not share your wallet, however according to this page, how it is interpreted, if you choose to decline this, you will not be eligible to receive Amazon prime benefits, however you still will be able to join the household.

You’ll need to enter a billing address, which is usually your primary residence or where you wish to receive all of your mail, packages, etc. all of the fields are required, except for address two, this is optional. Once you have completed the billing address information click on use this address to continue.
You can choose to skip prime video sharing. (Article I chose not to skip prime video sharing. I just continued with adding John Doe to the family.)
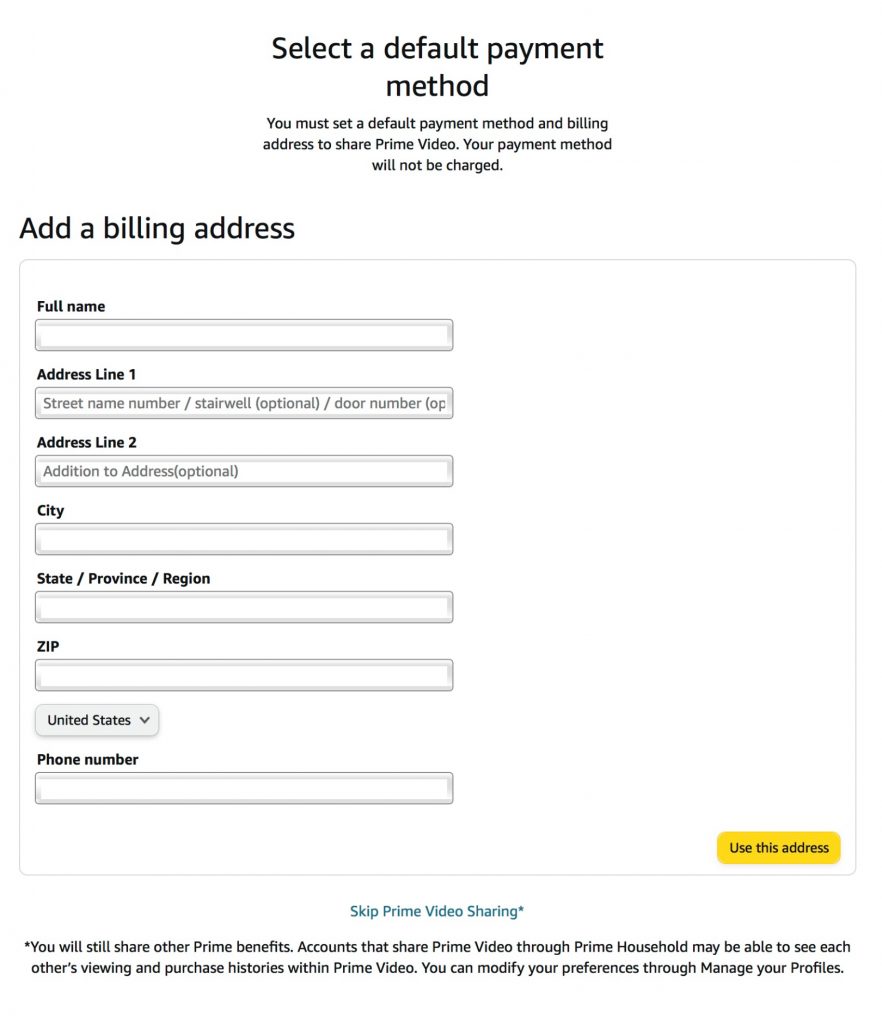
If you entered a address that Amazon does not recognize, it may ask you to use the suggested address or you can decline using the suggested address that they suggested, and use the address that you entered.
If you entered an address that Amazon does recognize, and you do not see a suggestion address, don’t worry, if you don’t see a suggested address, just simply continue with the set up process, if you do see a suggested address, and Amazon is suggesting, please verify that the address is correct by choosing that address, and then continuing with a set of process.
no photo available for this, so we will continue to be next part of the set up process.
Just like with the admin account, the admin can choose to share these items with you. You also have the choice to share these items with the admin as well. (The default setting is all three is checked, checked = yes, and unchecked = no) if you choose to leave it at the default setting, do nothing, and just press continue.
The next page is going to be asking for the name on the Credit card, credit card number, expiration date i.e. mm/yyyy and the three digit security code that’s usually found on the back of the credit card. Once a credit card information has been entered click on continue, which at this point you are finished.
During this process, if you chose not to add your credit card, don’t worry, you can always add it later when you go through the checkout process. You also will still have access to many Amazon prime membership benefits.
CONGRATULATIONS! You and the account holder a.k.a. admin is now sharing the benefits of Amazon prime membership.

Some things you should know:
- You and the account holder can choose to discontinue the sharing of Amazon prime membership, benefits, at time.
- If you choose to part ways by leaving the family, the changes will go into affect immediately, and there is no undo if later you change your mind.
- Each account holder can invite up to 10 people, two adults, four teens and four kids.
- If a person chooses to leave your family and you have already used up the number of slots available you must wait 180 days in order to re-add the person.
- This will apply to the account holder and anyone who they invite to boot a family member or if you were invited and you wish to leave the family, log into your Amazon account > click on Hello, Your name > from the drop-down menu, click on account > scroll all the way down to the bottom of the page until you see the section “ shopping program and rentals”, under this category, the third link down should say manage your Amazon family and click on that > on this page, you can see the person who invited you along with other people if they apply and your account. Tap on your account name and you’ll see a link that says remove.
- if you need additional help, you can always contact Amazon customer service either by telephone or by live chat.
happy shopping!